


How to Fit Aluminium Bifold Doors
Aluminium bifold doors are popular for seamlessly connecting indoor and outdoor spaces. To install them, begin by ensuring the opening is level, measured correctly, and clear of debris. Fit the bottom track first, then assemble the frame, followed by hanging the panels and securing the top guide rail. Test and adjust the doors for smooth operation before sealing and finishing. Key tools include a drill, spirit level, and silicone sealant. Always follow the manufacturer’s instructions and consult a professional for uneven openings or complex installations.

Why Bifold Doors Are Popular
Aluminium bifold doors have become a go-to choice for homeowners and designers who want to maximise light and open space. Theyre ideal for connecting indoor areas to patios, balconies, or gardens. But fitting these doors correctly is essential for smooth operation and lasting performance.
This guide walks you through the processwhether youre a professional or a confident DIYer.
Step-by-Step Fitting Guide
1. Prepare the Opening
Before anything else, inspect and measure the opening:
- Check level and plumb: Use a spirit level to ensure the top, sides, and base are all straight.
- Measure accurately: The width and height of the opening must match your door frames specifications, allowing minor clearance for adjustments.
- Clear debris: The surface should be clean, dry, and structurally sound.
If you're replacing an existing frame, carefully remove it without damaging surrounding materials.
2. Install the Bottom Track
The bottom track guides the folding motion, so it must be:
- Perfectly level
- Securely fixed into concrete, timber, or tile
- Aligned with the frame layout
Use packers if needed to ensure it sits flat and steady. A misaligned track can cause long-term performance issues.
3. Fit the Frame
Start with the sill and then attach the side jambs.
- Ensure corners are square.
- Use fixings recommended by the manufacturer (typically heavy-duty screws or bolts).
- Apply sealant between the frame and wall to prevent water ingress.
- Double-check alignment again before proceeding.
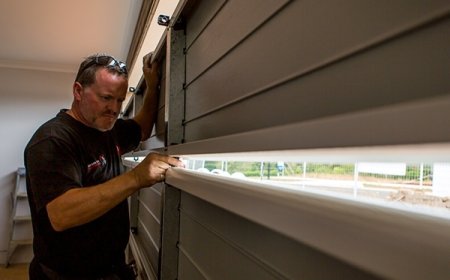
4. Hang the Door Panels
Each panel will come with hinges, rollers, and sometimes magnets. Follow this process:
- Hang the first panel onto its designated pivot point.
- Connect the next panel using the hinges provided.
- Repeat until all panels are in place and folding correctly.
- Panels should glide smoothly and fold neatly without rubbing or catching.
5. Install the Top Guide Rail
The top rail supports the weight and motion of the door. Fix it in place:
- Directly above the bottom track
- Aligned perfectly with the panel hinges
- Using brackets or supports as per the system design
The top rail ensures your aluminium doors wont sag or misalign over time.
6. Test and Adjust
Before sealing everything, test the doors:
- Open and close fully to ensure smooth operation
- Make fine adjustments to rollers or hinges if panels drag or are uneven
- Check the locks align properly with their keeps
- Take your time hereits better to get the motion right now than fix it later.
7. Seal and Finish
Once you're satisfied:
- Apply weather seals
- Use silicone or foam sealant around the frame edges
- Clean off fingerprints, dust, or adhesive residue
- A neat finish not only looks better but also protects your installation from moisture and air leaks.
Tools Youll Need
- Drill and bits
- Spirit level
- Measuring tape
- Screwdrivers
- Shims or packers
- Silicone sealant
- Allen key (for roller adjustment)
Final Tips
Always follow the manufacturer's instructions for the specific door system.
If the opening is uneven or youre unsure about structural integrity, hire a professional.
Check local building codes in your areaespecially for exterior installations.
Installing aluminium bifold doors may seem complex, but with attention to detail and the right preparation, its entirely achievable. Done right, the result is a seamless, space-saving, and stylish entryway that enhances your homes appeal.